Thursday, August 16, 2012

I hate my fireplace

I hate my grody fireplace.  It shall be my next project.

"Um.. are you sure your home was built in 2005?"
Yeah, the shell sinks, brick fireplace, and plastic bathroom faucets all point to my house being built in the 70's.  The shell sinks may win the battle, but the fireplace will not win the war.  It must be destroyed. 

Everybody comment and tell me what I should do! Oh, wait. I forgot I write this blog for my own entertainment.  I guess I'll see what I decide to do in the near future. For now, I need to finish my kitchen.

Thursday, August 9, 2012

Kitchen Project: Grouting the Backsplash

After watching a few videos on grouting mosaic tile backsplashes, I thought "Oh, this will be super easy". 

No. 

No, they make it look easy.  The women smearing the grout on with the grout float are freakishly strong, and I don't know how they made it look like the grout just easily wipes away with a sponge. I had to scrub that shit off, and I didn't wait the total drying time. 

The bottom and sides of the backsplash are going to be caulked.  The simple statement in the how to videos of  "don't grout the bottom of the tiles near the countertop" is way easier said than done.  It's difficult to maneuver the giant grout float to grout very close to the bottom in between the tiles and not get any on the very bottom.

Before furiously scrubbing the grout off

I used premixed gray grout, even though the woman in one of the videos I watched condescendingly said "I don't know very many professionals who use the premixed stuff".  Bitch, please. 

When putting the grout on, going in a 45 degree angle does help to get the grout in between the tiles.  There is a lot of scraping involved, and scrubbing it off the tiles after is a lot easier if you scrape as much of it off as possible.  I had to take frequent breaks because holding my arms up for that long made them really sore, but I am a weakling. 

Really glad I put in the under cabinet lighting because the grout makes it look even darker.

Wednesday, August 8, 2012

Kitchen Project: Backsplash and Under Cabinet Lighting

I added a recycled glass mosaic tile backsplash from Lowe's.  I would have rather had a lighter tile, but this was too cheap to pass up.

I bought premixed ready-to-use tile adhesive and applied it to the wall using a notched trowel.  At first, I was entirely too generous with the adhesive and did not scrape enough off the wall, and it squished through the tiles. I tried to get most of it off with a paper towel, and then had to use a utility knife after it dried to get all of the excess off.

I used a tile nipper to cut the areas around the electrical outlets.  Being a weakling, I was a bit concerned about using the tile nipper, but it turned out to not be difficult at all.

After I had all of the tiles on the wall, it looked way too dark. 

This led to my next project and ADD move: under cabinet lighting.

Better.  I installed Utilitech under cabinet lighting, which came in a pack of 5 with a dimmer.  Shamefully, and like a man, I did this without any research and without reading the directions.

Putting the lights up required a drill to get the screws to hold up the lights through the underside of the cabinet.  However, I did not have the correct drill bits to be drilling through the cabinets for the wires, but I was damned and determined to get it done anyway.  This led to a hot ghetto mess.  
Oops.
I drilled the first hole too low and it split the wood and the above happened.  At least the pack of lights came with little plastic wire holders that nail in. 

Better after that first incident, but still ghetto looking. Oh well, its done, and nobody needs to be lookin up under my cabinets.

I thought I was going to be able to easily run the cord straight up from the plug to start the under counter lighting and not have to drill a hole from the underside up into the cabinet. I did not take the dimmer box into account.
As you can see, the dimmer box in the cabinet is fairly large and needed to be hidden.  I hated that I  had to drill a hole large enough to fit the plug through the bottom of the cabinets, but oh well. To make this extra ghetto, I plan to try to color the exposed wire coming from the cabinet to the plug with a sharpie.

Will update after grouting.

Kitchen Project: Countertops

My ADD really came out on this one.  I started my countertop transformation, and then decided to do the backsplash in the middle of that project.  I don't recommend this, as the adhesive for the backsplash can be a bit messy.

First, I lightly sanded the countertops with 120 grit sandpaper.

Then I cleaned the countertops with Clorox wipes and Windex.  Many of the DIY sites said to use trisodum phosphate to clean the countertops with, but I said

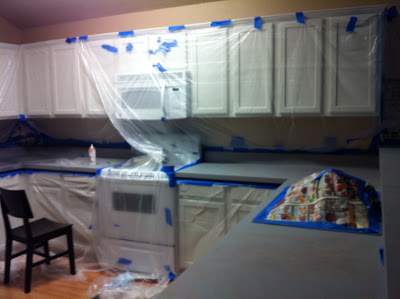
After cleaning, I taped everything off and added Dexter-style plastic to the cabinets.  I then primed the countertops with 2 coats of Glidden Gripper gray latex primer.  I read that you do not have to sand with this primer, but sanding the countertops isn't that big of a deal and I wasn't willing to risk it.
Looking pretty good already with just primer

As many other DIYers have used, I decided to paint my countertops with Krylon Make It Stone spray paint in Obsidian.  It took 3 coats for it to look like it was covering the primer.  Since I have a great deal of countertop space, this required 9 cans of spray paint. 


This crap got everywhere. Seriously, no one warned that the paint comes out in little flecks, and those flecks would end up 6 feet away, covering the floor in little black dots.  I waited until it was dry, and the flecks came up easily with a Clorox wipe.

The picture doesn't do it justice, it looks pretty good and like stone in real life.

I will be applying a sealant soon.  Hopefully it will end up shiny, gorgeous, and no longer textured.

I planned to use Envirotex pour on high-gloss finish, but with 50+ sqaure feet of countertop to cover, it would have taken around $130 to cover all of it.Instead, I will be using Minwax Polycrylic.

Kitchen Project: Cabinets

My kitchen was ugly. Wood on wood with wood. Wood, wood everywhere. Not cute.

I decided the cheap ass solution would be to paint the cabinets and put up a backsplash that I found on clearance. Oh, that would have been too easy.

When painting the cabinets, I followed the same steps as mentioned in the previous entry about the bathroom cabinets. I sanded with 120 grit sandpaper, cleaned the cabinets, taped everything off, primed with Kilz oil-based primer, and painted the kitchen white with Valspar Ultra White kitchen and bath enamel.

I didn't think my precious chihuahua would be interested in the stinky oil-based primer, but as soon as I left the room, she was drinking the paint like it was something to do.  In true Rick James fashion, she then proceeded to say "fuck yo couch!!" and vomited the oil-based paint all over the couch. 
It looks like someone put a bag of french fries on my couch.  I tried using just soap on the couch and scraping the paint off, and that worked to get the color out, but not the oil. I gladly accept suggestions on this matter.
Yum. Oily dog barf.


 Anyway, back to the project... I painted the bottom half of the cabinets and started noticing something was looking off, besides the kitchen hoarding.
After finishing the cabinets, I was pretty happy with them, but I knew something had to be done about the countertops. The white paint really made the ugly countertops stand out. Also, the backsplash I had purchased for the kitchen before painting the cabinets no longer looked like it matched the multicolored countertops. 
Finished Cabinets.

Tuesday, August 7, 2012

Same Project, Different Room

After the guest bath, I felt confident enough to transform the master bathroom's ugly cabinets. 

Please excuse the mess.

Again with the warped wood! The frame for this mirror has proven much more difficult than in the tiny guest bath, so I have not completed this room as of yet.  

Once again, not totally happy with it because of the shell sinks and ugly faucets, but it's much better than it was.

First Project: Guest Bath

I'm very angry with myself that I did not take a before picture. Here is the best that I could find.
Boring guest bath
 The guest bathroom has the same ugly oak cabinets as the kitchen, seen below.
Wood on wood with wood. Barf.
I decided to paint the cabinets an espresso color. I used Valspar Fired Earth kitchen and bath enamel.

1. I removed the cabinet doors and sanded the cabinets with 120 grit sand paper and then wiped everything clean.  No biggie.

2. Then I taped off the walls and counter and applied tinted Kilz oil-based primer. I had never worked with oil based paint before, and this stuff sucks, I tell you. It smells awful and it's very hard to make it look even.  I know, its just primer, it doesn't need to be even, but that messes with my OCD.

I'm also a very messy person, and I ended up with this oil-based crap all over myself. Of course, I just went to bed and thought, "I'll shower it off in the morning".  Uh, NO.  I had to go to work covered in paint.  Luckily, I work at a pharmacy, so I bought a bottle of baby oil and rubbed the paint off.
Not the best scent to have at work.

3.  I painted on 2 coats of the Fired Earth paint.

4. To create the border for the mirror, I bought a miter box and some baseboard wood.  I measured and cut it to fit the mirror. I then painted the wood with the Fired Earth paint, on the front and back of the wood. 

The wood was annoying to work with because some of the pieces were warped.

5.  I used Liquid Nail to glue the wood to the mirror.

Again, with the being a messy person, I got the liquid nail all over my hands.  I have to scan my fingerprints at work to clock in.  Apparently, I still had glue stuck on my fingers the next day because it could not read my fingerprints.  Probably not a problem anyone else will have.

 6. Drilled holes and added pulls and knobs. Freaking gorgeous.


Still hate the ugly sea shell shaped sink and water faucet, but that will be another project, another day.  It's still much improved from the ugly oak cabinets.


Intro to My Projects

I've been doing a lot of updating of my house lately, so I've decided to start chronicling my adventures in DIY home renovations.

The renovations started immediately after I purchased my home in 2008.  My house was a disgusting, no color, carpeted cat piss box of a foreclosure when I purchased it.  I immediately ripped up the stank ass carpet and vinyl floor, and installed laminate wood flooring and tile throughout the house. I painted the walls with Eddie Bauer Almond Oil, and added 2 accent walls in Cabin Red. 
Living Room. The fugly fireplace will be dealt with.
Bedroom. Yes, I was channeling my inner gothic teenager.
I had someone install the floor and tile, but I've gotten cheap and stubborn in my old age and decided I could tackle the rest of this house on my own. Hopefully this blog will help some other cheap, lazy DIYer with their renovations, or at least to learn from my mistakes.

Or it will just help me to remember what the hell I've done and what I used to do it. Whatevs.